Friday, March 30, 2012

Fill-age. For my shelves.

This is one of the items I put on my beautiful shelves.  It's a picture of Justin and me on our honey moon five and a half years ago.  (Don't we look like babies?)  It's nothing fancy, just a picture taped to a piece of card stock in a spray-painted frame.  It was a quick space filler at our old house.  But the picture wasn't centered and it was driving me crazy.

I got this bag from Hallmark around Christmas and have been saving it since then because I love the saying on it.  I decided Old Off-Center picture would be replaced by Fun Quote. 


So I cut off one side of the back and carefully took the handles off of it.  It still had a couple fold marks which I knew would really bug me.  So I ironed it.  That's right.  I ironed a paper bag.  I like to live on the edge.  I took the old picture out of the frame and then I used some good ol' Scotch tape loops and taped the bag to the other side of the card stock.  I left the picture on the back in case I ever change my mind and have a deep desire for an off-centered picture to be displayed in our home.  Okay, that's not true.  I was just lazy.


And here's the finished product on the shelf!  I love the pop of color it adds.


Isn't this such a good saying?  It reminds me not to save things for special occasions.  I should cook good, interesting food for my family all the time, not just when we're having people over.  I should make stuff out of the fun fabrics I've been accumulating instead of waiting for the "perfect" project.  I should enjoy and appreciate and celebrate life because that's just what it is - life!  And I'm so blessed to have Life.


Thursday, March 29, 2012

Shelf Time

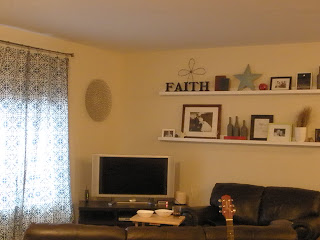
We have an awkwardly long wall in our family room.  Like really awkward.  Like when you're reading someone's graphic T-shirt and realize it looks like you're staring at their boobs.  The wall is awkward.  It's too big to put any art on and too small to make into two different areas. 

One day while wasting time researching on Pinterest, I came across this project from Ana White. 

Pinned Image

Aren't these shelves great?  And they're SOOOO easy!  Each shelf is 2 1x4s and 1 1x2.  Throw on some white paint and screw in a few screws and you have yourself some fantastic shelves. 

True Confession:  From the date of pinning to the date of completion?  About 10 months...  Nothing like a one-year-old's birthday party to kick my buns into gear...

Here's how it went down.  I used blue painter's tape to mark where I wanted the shelves.  I lived with the tape on the wall for a couple days to make sure I liked where the were.  (I ended up moving them a little farther apart than I had originally planned.)

My amazing husband made the shelves for me - which means I don't have any pictures of the shelf construction.  But Ana does a great job and her pictures and instructions are WAY better than mine would have been anyway.

Here's my man hanging the bottom shelf.

Starting to fill up!

And here are my beautiful shelves all filled!

I love my shelves.  A lot.  I told them I love them.  More than once.  They're the mac to my cheese, the spice to my girls.
See those curtains in that picture?  I love them as well.  My mom made them for us.  She asked if I needed help with anything for Drew's party.  I think she was offering to bring a fruit platter.  But I asked her to make curtains.  And she did.  She's awesome like that.

So now it's looking like we actually like our house and like living in it.  Oh, and everything on those shelves?  Yeah, I already had all of it.  Holla for free accessories!

Monday, March 26, 2012

Stationery card

Sweet Little Chick Easter Card
Modern shower invitations and holiday cards by Shutterfly.
View the entire collection of cards.

Thursday, March 22, 2012

Spring Wreath

I've been seeing so many cute spring wreaths on Pinterest.  They're just so bright and cheerful!  I decided that I wanted needed one.  I also decided that I had to make it with things I had on hand (aka - for free). 

I have a ton of fabric, so I knew I'd use that.  But what to use for the form of the wreath was a little trickier.  And, low and behold, I saw a wire hanger from my husband's dry cleaning that told me it wanted to become a wreath.  Well, it didn't acutally say that.  But if it could talk, I'm sure that's what it would have said.

So after some bending and re-shaping, I had an almost-circular hanger like this:

It's a game - find the hanger on the ironing board.  Oh, you haven't heard of that game?  It's all the rage in Europe.

Then I cut strips of fabric 1 1/2" wide and 4", 5" and 5" inches long.  And then I tied, tied and tied some more.  Here it is in progress.  Tip: make sure you tie the same way every time so your fabric "tails" all point the same way.  It took me about forty minutes to tie them all on.


And then voila!  I had a cheerful spring wreath!  And for free!  And it was easy!  I love anything cute, cheap and easy!  (Uhhhh, I mean I love any craft that's cute, cheap and easy...)

Happy spring!

Thursday, March 15, 2012

I'm baaack

Well hello again, Blog World.  It's been awhile (4+ months to be exact), but I'm done being lazy and will put more effort into our relationship.  :)

Anyway, the babe turned one at the end of February.  Crazy!  He's now a walking machine.  Within about a week and a half he became a full-fledged walker, learned to wave, learned to dance, learned to point and perfected his clapping.  It's been so much fun to watch!

My amazing cousin, Jill, took some great birthday photos of Drew.  Enjoy! 


PS - Thanks to Emily for kicking my blog-writing butt into gear!